
Effortless DIY Project: Build a Stock Tank Spa

Imagine transforming your backyard into a tranquil oasis of relaxation! With just some basic DIY know-how and quality materials, you can create your own luxury stock tank spa experience. Let this guide show you how to pick the perfect tank, install heating and filtration units, then add those all important finishing touches for an escape from reality right in your own home. Get ready to leave stress behind - it's time for a peaceful journey through the joys of self-care with one invigorating soak at a time!
1. Cost-effective: Compared to buying a typical spa or hot tub, building a stock tank spa is far less expensive. You may save money and personalize your spa however you like.
2. Simple to install: With some basic DIY abilities, installing a stock tank spa can be completed in a matter of hours. You can save money by not having to pay a specialist to install it for you.
3. Stock tank spas are mobile, allowing you to move them around your backyard or take them with you if you move. They are therefore a fantastic choice for renters or anyone who wants the freedom to move their spa.
4. The size, shape, and even the type of heater and filter you use can all be changed to suit your preferences with a stock tank spa. To create your own little hideaway, you may even add extras like jets, lights, and even a sound system.
5. Health advantages: Taking a spa bath helps relieve stress, enhance circulation, and ease muscle pain and tension, among other health advantages.
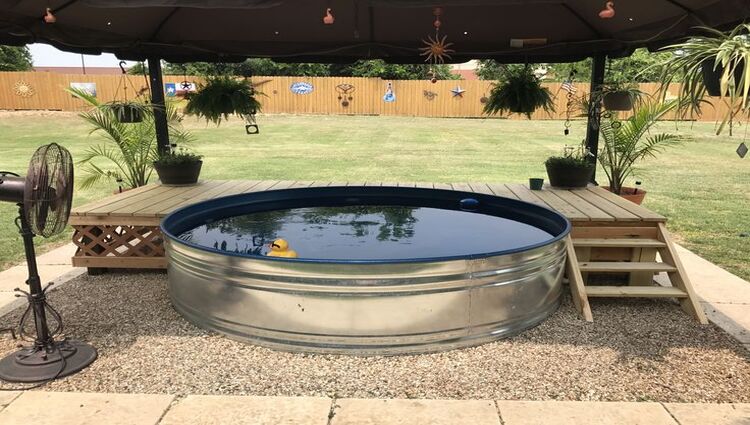
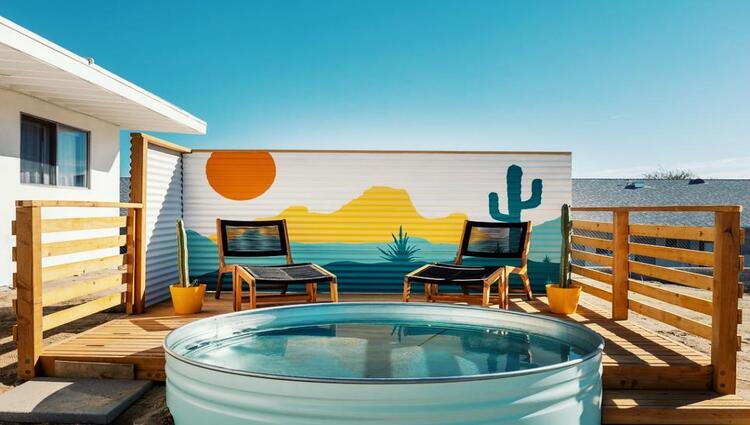
1. Stock tank: The first thing you'll need is a stock tank. You can find these at farm supply stores, feed stores, or online. Make sure you choose a tank that is big enough for your needs and fits in your backyard space. You can choose from different shapes, sizes, and materials.
2. Submersible pump: You'll need a submersible pump to circulate the water in your spa. Choose a pump that is the appropriate size for your tank. You can find these at home improvement or pool supply stores.
3. PVC pipe: You'll need PVC pipes to connect the pump to the tank. Choose pipes that are the appropriate size for your pump and tank. You'll also need fittings and glue to connect the pipes.
4. Heater: You'll need a heater to warm the water in your spa. Choose a heater that is the appropriate size for your tank. You can find these at pool supply stores or online.
5. Filter: You'll need a filter to keep the water in your spa clean. Choose a filter that is the appropriate size for your tank. You can find these at pool supply stores or online.
6. Thermometer: You'll need a thermometer to monitor the temperature of the water in your spa. Choose a waterproof thermometer that can be submerged in the water.
7. Chemicals: You'll need chemicals to maintain the water in your spa. These can include chlorine, pH balancer, and algaecide. You can find these at pool supply stores or online.
8. Accessories: You may want to add accessories to your stock tank spa, such as jets, lights, a cover, or steps. Choose accessories that fit your needs and budget.
1. Choose the right location: Select a location in your backyard that is flat, level, and can support the weight of the stock tank when filled with water. You should also consider the proximity to an electrical outlet and a water source.
2. Prepare the site: Clear the area of any debris or vegetation and level the ground if necessary. You may also want to add a layer of sand or gravel to create a level surface for the stock tank.
3. Install the pump: Install the submersible pump in the tank according to the manufacturer's instructions. Connect the pump to the PVC pipes that will carry water to and from the tank.
4. Install the heater and filter: Install the heater and filter according to the manufacturer's instructions. Connect the heater and filter to the PVC pipes.
5. Fill the tank: Fill the tank with water and turn on the pump, heater, and filter. Allow the water to circulate for several hours to ensure it is warm and the chemicals are properly distributed.
6. Add chemicals: Add the appropriate amount of chemicals to the water to maintain the proper pH balance, chlorine level, and algaecide.
7. Test the water: Use a waterproof thermometer to monitor the temperature of the water and a water testing kit to check the pH, chlorine level, and alkalinity.
8. Add accessories: Add any accessories you want, such as jets, lights, a cover, or steps.
9. Enjoy your spa: Once the water is warm and properly balanced, you can enjoy your new stock tank spa! Be sure to follow proper safety precautions and maintain the water quality to ensure a safe and relaxing spa experience.
Ready to Choose the Next DIY Project?
We have put together some amazing, yet simple DIY projects that go along way to sprucing up your home. Just simply choose what you would like to do from one of the DIY projects below, and get to work.


