
Service Hours
Office Hours: Mon-Fri 8AM - 5PM
508-208-1114
Call us today!
Want a level floor from living room to patio? Learn the one-plane sill method: waterproofing layers, drainage, and door systems that actually work.
If a single millimeter can ruin the magic, the “one plane” trick is how you take it back. According to the U.S. Access Board’s ADA door-threshold standard, thresholds on accessible routes are limited to ½ inch maximum in new construction—an influential benchmark that’s pushed designers toward safer, cleaner, and more universally usable transitions.
That number isn’t just about accessibility—it’s a performance signal. The closer your sill gets to “one plane,” the more natural your space feels, the less your eye stutters across a line, and the easier it is to move furniture, strollers, and trays from kitchen to terrace- creating a indoor and outdoor harmony.
What stands between you and that elegant, continuous floor? A tight choreography of structure, water management, and door hardware. Pull those elements into alignment and the result is a living space that looks custom-built for sunlight, breezes, and effortless entertaining.
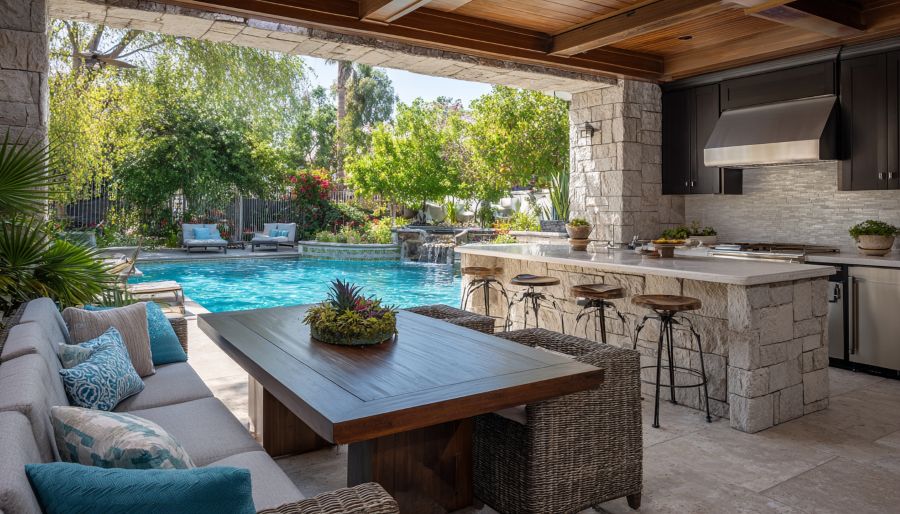
At its simplest, the one-plane approach aligns the interior finished floor and the exterior walking surface (deck, year round patio, or balcony) so they read as a single surface, with the door sill sitting flush—visually and physically. Achieving that with long-term durability demands more than just lowering the sill. It’s about building a layered assembly that deflects bulk water, drains what gets past, resists capillary action, and insulates against thermal bridging. By treating the sill as the center of a small, engineered watershed, you get the visual magic without the maintenance heartache. That foundation sets up everything else, which is why the next section focuses on why it matters beyond aesthetics.
When the inside meets the outside without a step or hump, the payoff is practical as well as beautiful. You’ll notice it in daily life, resale appeal, and even energy behavior.
With your “why” established, it’s time to get strategic about how water, structure, and materials cooperate—the building-science backbone.
Sills live at the crossroads of weather and interior comfort. That’s why the best flush assemblies are designed like miniature roofs:
Once the hydrology is right, structure and tolerances determine whether your “one plane” stays flat and tight for the long haul.
The sturdiest flush sill starts with framing that anticipates finish thicknesses, drainage space, and the door system’s pan depth. On slabs, a common approach is a slab recess at the opening; on framed floors, it’s a dropped joist bay or notched rim with blocking for the door pan.
Now that the supporting structure is ready, your choice of door system becomes the next critical variable.
Not all doors are created equal when “one plane” is the target. Multi-slide and lift-and-slide systems are favorites because they concentrate weather seals within a recessed track and can integrate with sloped pans and linear drains. Top-hung systems keep floor tracks minimal, while threshold-style swing doors need special attention to gasket design.
Door chosen? Great. The next detail that makes or breaks the one-plane experience is the hidden waterproofing stack-up.
Think of the sill pan as a stainless-steel (or heavy-duty composite) canoe under your door. It should be fully supported, gently sloped to the exterior, and sealed to the wall’s water-resistive barrier. Add end dams to keep water from wandering sideways, and ensure sealants are compatible with the door manufacturer’s gaskets.
With the pan and WRB integrated, you’re ready to provide the water with a destination: the drain.
The most elegant flush sills pair with concealed linear drains just outside the track. The grate can align with your grout joints or deck boards; under it, a channel carries water away from the house. On balconies, a door-adjacent slot drain connected to the waterproofing layer can move water to scuppers without visual clutter.
Drains planned? Time to set the exterior walking surface perfectly flush—and that’s where patios become your best friend.
A flush threshold is only as convincing as the patio that meets it. Systems that offer micro-adjustments shine here:
Because these assemblies are “floating,” you can fine-tune slope to the drain while keeping the walking surface perfectly level to the interior. From patios, let’s pivot to performance, because thermal comfort matters as much as looks.
Level doesn’t mean leaky. High-performance sills use thermal breaks under tracks, insulated pans, and tight gasket packages to reduce heat loss and infiltration. Consider:
With performance locked in, we can look at retrofit options—because not every project starts as a clean-sheet design.
In remodels, getting to one plane is part detective work, part surgery. You’ll map finish stacks, locate waterproofing, and protect structure while opening up the sill zone.
Retrofit or new build, every one-plane project benefits from crystal-clear sequencing—so let’s spell that out.
A clean one-plane finish depends on trades moving in the right order:
Once the choreography is set, it’s helpful to anticipate common pitfalls—and the pro fixes that avoid them.
Speaking of pros, it’s worth hearing how seasoned specialists frame the one-plane challenge.

“Treat the sill like a miniature balcony,” notes a senior Miami New Consturction Show consultant who specializes in coastal residences. “Give water an easy exit, build redundancy, and your flush line will look flawless years later.”
A longtime luxury-residential builder adds, “Our best results come when the door rep, roofer, and tile setter are in the same kickoff meeting. One hour together saves ten hours of rework when the drain, pan, and grout lines line up perfectly.”
Next up, let’s cover finishes—because the last 3 millimeters can make or break the illusion.
Your eye reads continuity by color, module, and joint. Use that to your advantage:
Finish coordination is half art, half discipline—and it accelerates when everyone sees the same target. That’s where mockups earn their keep.
A jobsite or shop mockup—even a 4- to 6-foot section—lets your team test waterproofing laps, drainage, finish heights, and panel clearances. Flood it with a hose, run a leaf blower at the seals, roll a cart across it. Document the final stack with photos and elevations. With the path proven, the main opening proceeds faster and with fewer RFIs. After the mockup, ongoing care keeps performance tight.
Flush sills perform for decades when you treat them like precision equipment:
A little diligence preserves both the look and the engineering that makes the one-plane magic possible.
With budget priorities sorted, let’s connect the one-plane trick to broader project goals.
A true one-plane opening changes how you live. Morning sun bleeds across one continuous floor; furniture clusters can straddle inside and out; party traffic flows without bottlenecks at a step. Even cleaning feels simpler—no crumb-catching lip, no swollen threshold after a rainstorm. Put simply: form meets function without compromise.
The “one plane” trick isn’t a gimmick; it’s a disciplined system that aligns structure, waterproofing, drainage, and door hardware around a single idea—no visible or functional break between indoors and out. Execute that choreography, and you’ll get the quiet luxury people notice without knowing why: safety underfoot, air-tight comfort when closed, and a patio that feels like a natural extension of the living room.
So, if a millimeter can ruin the magic, imagine what reclaiming that millimeter can do for your home—will your next project be the one that erases the line between inside and out?